SE-Connect Mode via the GUI
There are plenty of guides out there that explain how to put a Cisco AP in SE-Connect mode via SSH, but what about the GUI?
Remember that if you want to do this, you'll need to have converted your AP to autonomous mode. To convert my AP, I used this excellent guide. The only thing I had to do differently with my Cisco 3600 was hold down the "mode" button until the LED turned amber, and then turned off (instead of just holding the button until the LED turned red like the guide describes).
Once your AP is running an autonomous image, you're ready to go!
1. Log into your Cisco AP. If you haven't changed the password (and you should), the username is cisco, and the password is Cisco.
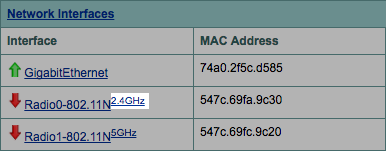
2. On the Home page, click on the 2.4 GHz link next to Radio0-802.11N.
3. Click on the Settings tab.

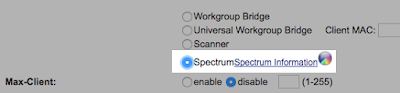
4. At Enable Radio, select Enable. At Role in Radio Network, select Spectrum. Click Apply at the bottom.

6. Go back to the Home screen, and do the same process for the 5 GHz radio (enabling it, setting the role to Spectrum, and applying the settings).
7. Click on the Spectrum Information link.
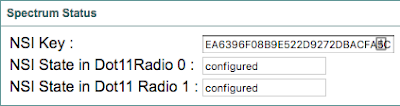
8. After a moment, the NSI Key field will populate.
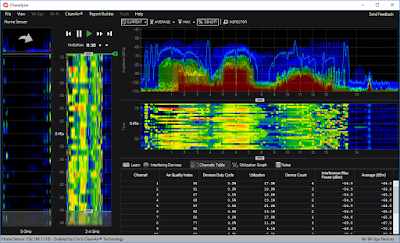
That's it! Now you can grab the NSI key and IP address, and take it to either Chanalyzer + Cisco CleanAir or Cisco Spectrum Expert to perform remote spectrum analysis.
Remember that if you want to do this, you'll need to have converted your AP to autonomous mode. To convert my AP, I used this excellent guide. The only thing I had to do differently with my Cisco 3600 was hold down the "mode" button until the LED turned amber, and then turned off (instead of just holding the button until the LED turned red like the guide describes).
Once your AP is running an autonomous image, you're ready to go!
1. Log into your Cisco AP. If you haven't changed the password (and you should), the username is cisco, and the password is Cisco.
2. On the Home page, click on the 2.4 GHz link next to Radio0-802.11N.

3. Click on the Settings tab.

4. At Enable Radio, select Enable. At Role in Radio Network, select Spectrum. Click Apply at the bottom.


6. Go back to the Home screen, and do the same process for the 5 GHz radio (enabling it, setting the role to Spectrum, and applying the settings).
7. Click on the Spectrum Information link.
8. After a moment, the NSI Key field will populate.

That's it! Now you can grab the NSI key and IP address, and take it to either Chanalyzer + Cisco CleanAir or Cisco Spectrum Expert to perform remote spectrum analysis.

Have you tried this on a 3702I-B-K9 AP yet? Thanks for posting!
ReplyDeleteI haven't, but as far as I know, the process is exactly the same.
ReplyDelete